
What is a Trading180 Supply & Demand Zone Trading Course for Cheap?
When you become a member of Trading180, you’ll have access to a wealth of fundamental & technical resources that will help you become a successful trader.
What You’ll Learn In Supply And Demand Zone Trading Course

SUPPLY AND DEMAND ZONE TRADING COURSE
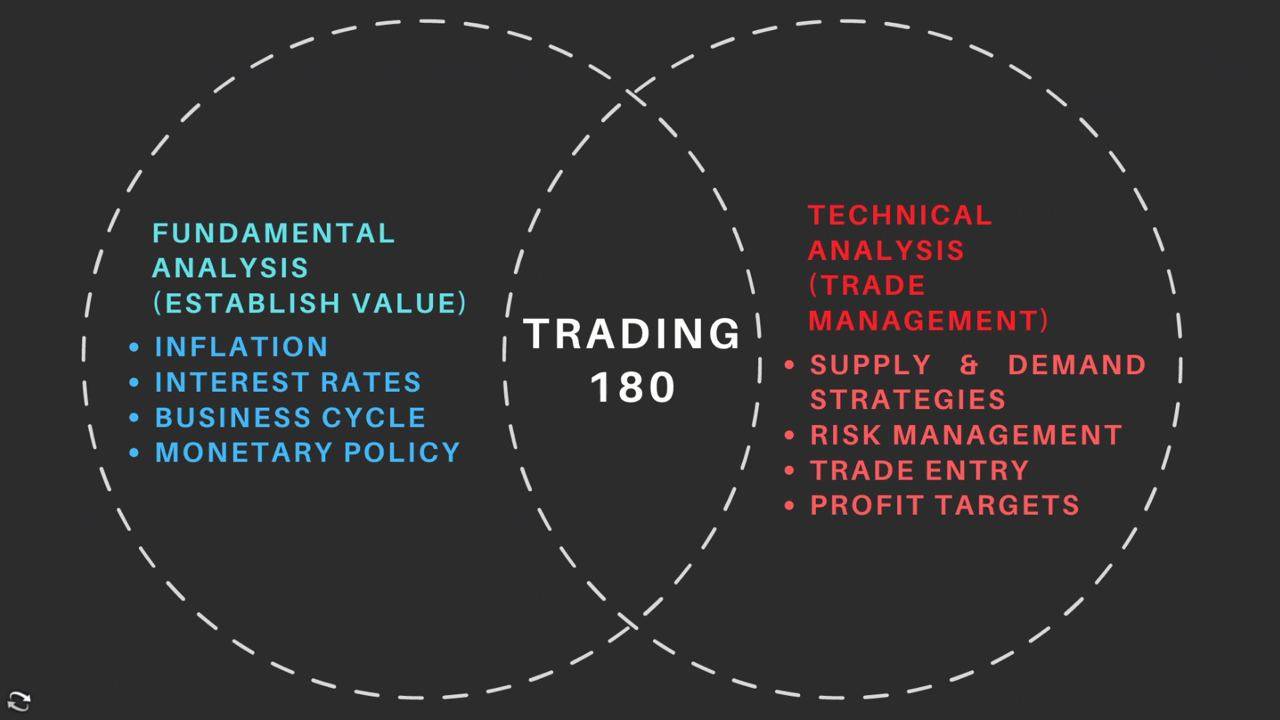
Trading 180’s unique technical analysis approach to identifying the best supply and demand zones using a combination of tools and indicators will be revealed in this course.
You will learn how to consistently determine whether the current foreign exchange rate displayed on a price chart is undervalued, fair value, or expensive, and how to profit using a variety of entry methods, risk management strategies, and profit target strategies.

CPR LOCATION & STOP HUNT MANIPULATION STRATEGIES
Trading is a zero-sum game, which means that in order for one person to win, someone else must lose. Capture Pain Relief (CPR) trading teaches you how to profit from common losing trader mistakes and strategies, as well as identify where the volume of supply or demand is located using technical analysis.
The Stop Hunt Manipulation course teaches you how to profit from bank manipulations centred on obvious levels of support and resistance, also known as liquidity hunting.

FUNDAMENTAL ANALYSIS SPREADSHEET
Fundamental analysis is a method of determining the intrinsic value of an asset by investigating related economic and financial factors.
Understanding fundamental and risk sentiment is the foundation of Trading180’s approach to the forex market. Our fundamental analysis spreadsheet simplifies the complex process of determining currency exchange rate value by identifying the strongest and weakest currencies based on market-moving macroeconomic data such as GDP, interest rates, and inflation
Trading180 Supply & Demand Zone Trading Course Index:
📄 SalesPage.txt (27.00 B)
📁 Course
📄 1. Supply & Demand Zone Trading – Introduction.mp4 (246.67 MB)
📄 10_Supply_&_Demand_Zone_Trading_Bar_Replay_Trade_Examples.mp4 (370.01 MB)
📄 11. The Value Range Tool.mp4 (623.46 MB)
📄 12. Supply & Demand Order Flow Equation – Revisited.mp4 (418.45 MB)
📄 13. 2 Candlestick Trend Entry Setup.mp4 (156.15 MB)
📄 14. 1. The Zero Sum Game Iceberg Orders Liquidity & Slippage.mp4 (173.09 MB)
📄 15. 2. The Stop Hunt Technical Setup.mp4 (131.23 MB)
📄 16. 3. The Stop Hunt Entry Candlestick – Part 1.mp4 (27.07 MB)
📄 17. 4. The Stop Hunt Entry Candlestick – Part 2.mp4 (46.27 MB)
📄 18. 5. The Stop Hunt Entry Candlestick – Part 3.mp4 (107.79 MB)
📄 19. 6. The Stop Hunt Pinbar Candlestick Entry.mp4 (132.61 MB)
📄 2. Order Flow Equation.mp4 (164.44 MB)
📄 20. 7. The Stop Hunt Technical Setup – Recap.mp4 (113.29 MB)
📄 21.8. How To Spot A Stop Hunt Candlestick Failure Entry.mp4 (113.43 MB)
📄 22.1. Capture Pain Relief (CPR) Location Trading – Introduction.mp4 (25.83 MB)
📄 23 2. Fomo & Loss Aversion.mp4 (63.90 MB)
📄 24. 3. The 3 Technical Trading Disciplines.mp4 (13.05 MB)
📄 25. 4. Supply & Demand Order Flow Equation.mp4 (27.77 MB)
📄 26. 5. The CPR Location Process.mp4 (45.53 MB)
📄 27. 6. The Breakout CPR Location Setup – Part 1.mp4 (70.79 MB)
📄 28 .7. The Breakout CPR Location Setup – Part 2.mp4 (72.61 MB)
📄 29. 8. The Retracement CPR Location Setup – Part 1.mp4 (45.94 MB)
📄 3. Supply & Demand Candlestick Zones.mp4 (196.39 MB)
📄 30. 9. The Retracement CPR Location Setup – Part 2.mp4 (38.40 MB)
📄 31. 10. The Level CPR Location Setup.mp4 (56.29 MB)
📄 32. 11. The Gap CPR Location Setup.mp4 (27.38 MB)
📄 33 . 12_Capture_Pain_Relief_Locations_Using_Daily_Candlestick_Price_Action.mp4 (88.13 MB)
📄 35. 13_Capture_Pain_Relief_Zone_Training_61_8_Fibonacci_Failure_Trade.mp4 (118.12 MB)
📄 36. 14. CPR News Data Confluence_2.mp4 (48.71 MB)
📄 37. 15. Capture Pain Candlestick Entry Setups.mp4 (39.28 MB)
📄 39. 17. CPR Location Recap.mp4 (33.40 MB)
📄 4. How To Trade Daily Supply & Demand Zones.mp4 (27.87 MB)
📄 40. The Process.mp4 (130.87 MB)
📄 41. JAPANESE_CANDLESTICK_ENTRIES_CAPTURE_PAIN_CANDLESTICK_AND_2_CANDLE.mp4 (292.50 MB)
📄 42. MULTI POSITION TRADE ENTRIES AND PROFIT TARGETS.mp4.mp4 (122.95 MB)
📄 43 . PROFIT TARGETS USING THE DAILY TIMEFRAME.mp4 (84.89 MB)
📄 44 .TRAILING YOUR STOP LOSS.mp4.mp4 (64.48 MB)
📄 45. DAILY VOLUME DIVERGENCE & CONVERGENCE ENTRY METHOD.mp4.mp4 (412.09 MB)
📄 46. VOLUME_DIVERGENCE_&_RSI_EXTREME_ENTRIES_ON_THE_4,_6,_8,_&_12H_TIMEFRAMES.mp4 (118.85 MB)
📄 47. VOLUME_DIVERGENCE_AND_RSI_EXTREME_ADVANCED_TRADING_PROCESS_ON_THE.mp4 (186.51 MB)
📄 48. UNDERSTANDING THE CURRENCY VALUE CYCLE.mp4.mp4 (189.73 MB)
📄 5. Supply & Demand Zone Odds Enhancers – Part 1.mp4 (59.82 MB)
📄 50. Brent_Donnelly_The_Art_of_Currency.pdf (18.83 MB)
📄 51. Fundamental_Analysis_Webinar_The_3_Steps_To_Generating_Profitable.mp4 (453.46 MB)
📄 52. How_To_Forecast_Huge_Trends_Using_Forex_Fundamental_Analysis_Webinar.mp4 (96.56 MB)
📄 53. The Rules To The Forex Fundamental Analysis Game.mp4 (446.09 MB)
📄 54. Dec 05 – 09 12 2022.xlsx (10.77 KB)
📄 55. how to use the fundamental analysis spreadsheet v4.2.mp4.mp4 (94.27 MB)
📄 56. 1. Managing Your Forex Trading Expectations.mp4 (92.87 MB)
📄 57. 2. Managing Your Forex Trading Expectations – Part 2.mp4 (84.73 MB)
📄 58. Neuroplasticity.mp4 (92.16 MB)
📄 59. The Profitable Forex Trader Mindset.mp4 (57.22 MB)
📄 6. Supply & Demand Zone Odds Enhancers – Part 2.mp4 (79.37 MB)
📄 7. Supply & Demand Zone Odds Enhancers – Part 3.mp4 (105.91 MB)
📄 8. Supply & Demand Zone Odds Enhancers – Part 4.mp4 (178.77 MB)
📄 9. Trend Line Breaks Revisited.mp4 (159.32 MB)
💬 Feel free to REACH OUT to our CHAT support for personalized assistance and detailed information tailored to your needs. We’re here to help!


Reviews
There are no reviews yet.